Thursday, July 5, 2018

The Splendid Sampler II, Block 4: Balance


Today we start Week 4 of the Splendid Sampler 2 Block-of-the-Week quilt along.

Last week, we introduced you to the Week 3 block designed by Helen Stubbings of Hugs 'n Kisses, called Clamshells. 

This week, we travel to Norway to meet designer and shop owner Wenche Wolff Hatling of Northern Quilts. Wenche's adorable, I-want-to-make-more block is called Balance.

Here is my version of Wenche's block:


Before beginning, I knew I wanted to make my elephant from polka dot fabrics. I decided upon my yellow and cream polka-dot print to make my sweet polka-dot elephant, reminiscent of the spotted elephant from Misfit Island in the Rudolph the Red Nosed Reindeer Rankin/Bass film from my childhood. I so wanted to adopt her when I was a young girl.

After choosing my sweet elephant's print, I then choose the blue ticking background fabric and decided how the wobbly stand needed to have visual strength (for my girl to stand upon). Therefore, I chose a dark gray and red mottled solid from the fabric collections I'm using. Then, with just the right hue, I chose An Auriful dark gray cotton embroidery thread for the outline of her head and ear, her eye, and her tail. I contemplated adding an upshoot of water coming from her trunk and, for the time being, will keep her as Wenche designed her: Oh-so-sweet upon her circus platform!


I once again used Helen Stubbings' Hugs 'n Kisses Applique Paper. Many years ago, I taught myself how to do turned-edge applique using freezer paper and I am now hooked on Helen's paper and technique. She has easy-to-follow instructions on how to use it through her YouTube videos.


Please let me know if you have any questions! I hope you enjoy making this block as much as I did!


The Splendid Sampler 2 book will be available October 2018. It is currently available for pre-sale so order your copy, now!

Thursday, June 28, 2018

The Splendid Sampler II, Block 3: Clamshells


Today we start Week 3 of the Splendid Sampler 2 Block-of-the-Week quilt along.

Last week, we introduced you to the Week 2 block designed by Rebecca Bryan of Bryan House Quilts, called Milk and Cookies. 

This week, we go all the way to Australia to meet the talented Helen Stubbings of Hugs 'n Kisses. Helen's adorable and fun-to-make block is called Clamshells. Here is her version:


Splendid Sampler 2, Block 3: Clamshells by Helen Stubbings


I've never made clamshells before and really enjoyed making this block. In fact, I'm planning on making an entire quilt using clamshells!

Here is my version of Helen's block:


Before beginning, I laid out my fabrics for the clamshells. I wanted to space out the colors so that a particular color didn't touch another clamshell of the same hue.


Next, applied a thin, iron-on stabilizer to the back of my background fabric, covering the entire 7" square, and then I prepared my appliqué.

I created my clamshells using the pattern instructions and Helen's Hug 'n Kisses appliqué paper, which made the process enjoyable for me. What I especially like about Helen's appliqué paper is that it works as a stabilizer and then washes out. The sheets come in a package of 20 and each sheet measures 8.5" x 11". The leftover scraps of the appliqué paper can be saved and used in a future project.


Helen has helpful videos that explain how to use her appliqué paper, so before you know it, you'll be able to make perfect arcs for your clamshells.

After appliquéing the clamshells to the base fabric, I taped the pattern to the window of my sewing room, then taped my block on top of it. I then traced the flowers onto the face of my base fabric, and then outlined the flowers using a double strand of Aurifil Red #8260 Lana Wool thread. I like how the thread gave the outline of the flowers a nice measure of thickness and a bit of a fuzzy look. When I do redwork embroidery, I stitch my stitches tiny and close together so that there aren't any stitches sticking out around curved edges; the stitching looks smooth and rounded.


Although my block is 6 1/2" square, my vertical right seam allowance is narrow. I'll be sure to pay attention to that when I'm piecing my quilt top together so that I achieve the look of a 1/4" seam.


Please let me know if you have any questions! I hope you enjoy making this block as much as I did!


The Splendid Sampler 2 book will be available October 2018. It is currently available for pre-sale so order your copy, now!

The Splendid Sampler II: The Fabrics For My Blocks


Whether you're a novice or seasoned quilter, choosing fabrics for your quilting projects can sometimes become a daunting task.

Should I use solids, prints, or both?

What theme or style of fabrics should I use?

What colors should I choose?

How many prints do I want to work with?


I love working with prints over solids.

I love designing scrappy quilts.

I prefer not to use solids if I can help it: I'd rather find a small or subtle print to use in place of them.


I believe the number 1 reason why I prefer working with prints over solids is because they invoke visual interest.


I'm using dry cleaner hangers to hang my fabrics on so that I can work with them easier and so that they don't wrinkle.


For the Splendid Sampler 2 Block-of-the-Week, I've chosen to use an older fabric collection by Sweetwater for Moda called Hometown. I've had a fat quarter bundle of this collection in my stash for several years and was waiting for the perfect project to use it with.


As I'm cutting into the fabrics, I'm realizing that I'd like to incorporate some additional prints to add a bit more depth. So I've chosen to integrate some prints from another, older collection from my stash called Circa 1934 by Cosmo Cricket for Moda.


I've also decided to check out a few of my local quilt shops, soon, for a few extra additions. Adding in more prints by other fabric designers will help diversify the look of my quilt, adding even more interest for a unique, scrappy finish.


Thursday, June 21, 2018

The Splendid Sampler II, Block 2: Milk and Cookies


Today we start Week 2 of the Splendid Sampler 2 Block-of-the-Week quilt along.

Last week at the kickoff of Splendid Sampler 2, where we introduced you to Alex Veronelli's block, Quilt Market, I mentioned that I would talk about the fabrics I'll be using for my Splendid Sampler 2 blocks. So with that said, I'll be writing a separate blog post soon to tell you about the fabrics I chose to use.

 I'm so excited about today's block. It was designed by Rebecca Bryan of Bryan House Quilts, and was so much fun to make. It's called Milk and Cookies. Here is Rebecca's block:


Splendid Sampler 2: Milk and Cookies by Rebecca Bryan


It has been quite some time since I've done a lot of appliqué. Because of this, I decided to take a few minutes to study the block and think through how I was going to achieve a perfectly round circle using the wedge template from the pattern, and Fabrics C and D.

I decided upon the English Paper Piecing (EPP) technique to sew the wedge pieces together, and then add the center "cookie" circle.

This is how I achieved it using what I had on-hand:

1. Cut out the wedge (cut out along sew line; not seam line) and circle templates, trace them onto either template plastic or poster board; cut out shapes.

2. Trace 12 wedge shapes and 1 circle onto heavy-weight paper; cut out shapes from paper. I used 24lb. printer paper that I use for my home office printer. It's a bit thicker than regular printer paper and I use it for all of my EPP projects.

3. Using a fabric glue stick, dab a bit of glue in the center of one of your paper wedges. Place the glue-side of the wedge onto the WRONG side of Fabric C and make sure to leave enough room around the outside edge of the paper wedge for a 1/4" seam allowance.

4. Cut out the wedge shape from Fabric C, leaving a 1/4" seam allowance. Using a needle and thread, gently fold the seam allowance onto the back side of the wedge shape and baste in place. Make (6) using Fabric C and make (6) using Fabric D.

5. In the same manner, dab a bit of glue in the center of the circle shape. Center and place the glue-side onto the WRONG side of your 3 1/2" x 3 1/2" fabric square, leaving enough room for seam allowance.

6. Cut out circle shape from fabric, leaving 1/4" seam allowance, and baste seam allowance to the back side of the circle.

7. Using a narrow whip stitch (i.e., sew stitches close together) and with right sides together, sew the prepared Fabric C and Fabric D wedge pieces together, alternating, to make a Pieced Wedge Ring. Be sure to line up the edges before you begin stitching each wedge-shape pair together. 

8. Referring to the following image, lay the prepared red circle in the center of your Pieced Wedge Ring (yellow/green fabrics).


9. Baste-stitch the red circle to the Pieced Wedge Ring as shown in the following image. Note: the basting stitches appear loose to show you how to do it. You can tighten them up to secure them. The basting stitches will be removed after you've sewn the red circle to the yellow/green wedge ring.


10. Here is another image showing you how I basted the two pieces together. You'll want at least (6) basting stitches, as shown, to stabilize the project before you stitch the units together.


11. As you did when you pieced the wedge pieces together, whip stitch the red circle to the pieced wedge ring then remove the basting stitches when finished for a perfect circle to appliqué to your 6 1/2" x 6 1/2" pieced base unit to finish your block.

Note: I waited until after I appliquéd the large circle to the base unit to remove the EPP paper. How I did this was I first cut the base unit fabric from the back of the circle leaving a 1/4" seam allowance; this opened up the back of the EPP unit and so I then removed my initial basting stitches to remove the paper.

Here is my version of Milk and Cookies:


If you have any questions, please let me know!

In my next post, I'll be talking about the fabrics I'm using for The Splendid Sampler 2.


The Splendid Sampler 2 book will be available October 2018. It is currently available for pre-sale so order your copy, now!

Thursday, June 14, 2018

The Start of Splendid Sampler II, Block 1: Quilt Market


After a year of organizing and with secret emails being exchanged (as well as a secret online group created for us to vent our excitement over the preparations for this much anticipated kick-off!), Splendid Sampler 2 is here!


Pat Sloan
Jane Davidson, a.k.a. QuiltJane


The extraordinary team of Pat Sloan and Jane Davidson have, once again, gathered a passionate, creative group of designers allowing us to share our talents and our stories with you.


What is Splendid Sampler 2? It is an exciting, engaging block-of-the-week quilt along that consists of 100 blocks finishing at 6" square, once sewn together into your very own masterpiece!

This sampler is unique in that Pat and Jane asked each of us to design a special block from our heart; one that reflects our passion for quilting. My unique block design will be revealed at a future date!

Let's begin!

Block 1 was designed by the delightful, smart, and innovative, Alex Veronelli of Aurifil. Alex's block is called: Quilt Market. My interpretation of his design is reminiscent of the rows of market booths presenting their current products and designs to the professional quilting community. We are a community built upon relationships that begin in quilt shops, guilds, and through social media.


When I chose the individual prints for my version of the Quilt Market block (I'll talk more about my chosen fabrics for the blocks I'm making for Splendid Sampler 2, next week), I decided I would place fabrics in my layout so that each fabric would not touch another fabric of the same color. I felt doing this would add interest to my block. I also decided I would add a solid neutral to use as visual "spacers" when I sewed my groups of 3 fabric strips together into Alex's block design. As an aside, I typically don't use many solids in my quilt designs. However, I like how the neutral solid fabric used here, allows for the surrounding fabrics to show-off and shine (also, allowing for a place for the eye to rest, therefore, adding a sense of calmness between the visual busyness of the prints).

Throughout this journey while I make my version of my fellow designers' blocks, I will test myself to make the best use of my fabrics. I've found that I'm taking extra time to think through what prints I'm using in each patch to accentuate the personality of each block. Additionally, each week I'll share tips and tricks that I've learned over the course of my career in design regarding color, the use of prints, balance, in addition to sewing tips, applique techniques, and many other things. I hope you will join me over the next year and will think of it as an expedition filled with excitement and learning something (or, perhaps many things) new!


The Splendid Sampler 2 book will be available October 2018. It is currently available for pre-sale so order your copy, now!

Wednesday, April 26, 2017

Faded Memories Blog Tour: Nantucket Holiday Quilt

Hello and Welcome to Day 3 of the Faded Memories Blog Tour!


I'm Susan Guzman . . . Today I'm your host, and I'll be showing you something pretty you can make using Gerri Robinson's gorgeous new collection called Faded Memories for Penny Rose Fabrics. Faded Memories can be purchased as yardage and pre-cuts (check out a few of my many pre-cut patterns).


Gerri and I have been great friends for many years and when I think of Gerri, I think about her inviting smile, the joy that comes from her laughter, and the warmth she exudes to everyone she meets. She's a delight to be around and it's so neat to study her quilts, her books, and her fabrics because she pours such magnificent artistry into everything she does.


When Gerri first asked me to join her blog tour, I felt a desire to show off her new Penny Rose collection as best I could. Therefore, I decided to design and make a medallion quilt.


This is a digital image of the finished quilt. See photos for actual fabrics.


I love medallion quilts because they're fun to construct and the end result is always so beautifully displayed on a bed.


They're great to make for personal use or as a special gift, such as for a wedding present or anniversary gift.


My medallion quilt using Faded Memories is called Nantucket Holiday (pattern available through my website now for pre-order!).


I have such fond memories of Nantucket from when my husband and I lived along the south shore of Massachusetts and took a quick trip there, one summer. Nantucket boasts quaint shops adorned with hanging flower baskets, charming houses, beautiful views and a strong sense of what one thinks of as having the look and feel of Americana.


Nantucket is steeped in history with American flags flying everywhere you look. Faded Memories was the catalyst of all of these treasured memories flooding back to me when I first laid eyes on the gorgeous florals and color combinations of the collection.

My Nantucket Holiday quilt pattern is available for early purchase through my website now, with my pattern's first shipment going out next week on Wednesday, May 3, 2017. The pattern will include two sizes: an oversize throw that measures approximately 68" x 68" (shown below).


The second size, a bed size quilt approximately 86" x 86", is shown as a flat digital image earlier in this post and on the pattern cover.


The backing I chose for my bed size quilt is black ticking.


Thank you so much for spending time with me on this very special blog tour! Be sure to visit the blogs (and websites) of all of the talented designers who are participating in this tour:


Monday, April 24
Crystal Delaney, The Clever Quilt Studio 
http://cleverquiltstudio.com/

Tuesday, April 25
Joan Hawley, Lazy Girl Designs
http://www.lazygirldesigns.com/

Wednesday, April 26
Susan Guzman, SuzGuz Designs
http://suzguzdesigns.com/

Thursday, April 27
Jina Barney, Jina Barney Designz
http://jinabarneydesignz.com/

Friday, April 28
Andy Knowlton, A Bright Corner
http://www.abrightcorner.com/

and

Friday, April 28
Penny Sturges, Quilts Illustrated
http://www.quiltsillustrated.com/


Wednesday, October 26, 2016

An Afternoon of Scouting, Part II

I left off yesterday at the Hotel De Paris in Georgetown, Colorado. Georgetown's main street is only 2-3 blocks long but filled with historic buildings from the 1800's.


Across the street from the hotel sits an art gallery, of which you'll find several in town, as well as the town hall and police department.


The neighborhood of houses can be as wee as this sweet place . . .
. . . and is filled with charming clapboard homes from long ago.

This is one of the larger, Victorian-era homes in the neighborhood and has an unusually generous lot.

Above is the old schoolhouse built in 1874. It's been fully renovated and a testament to the architecture of the time.

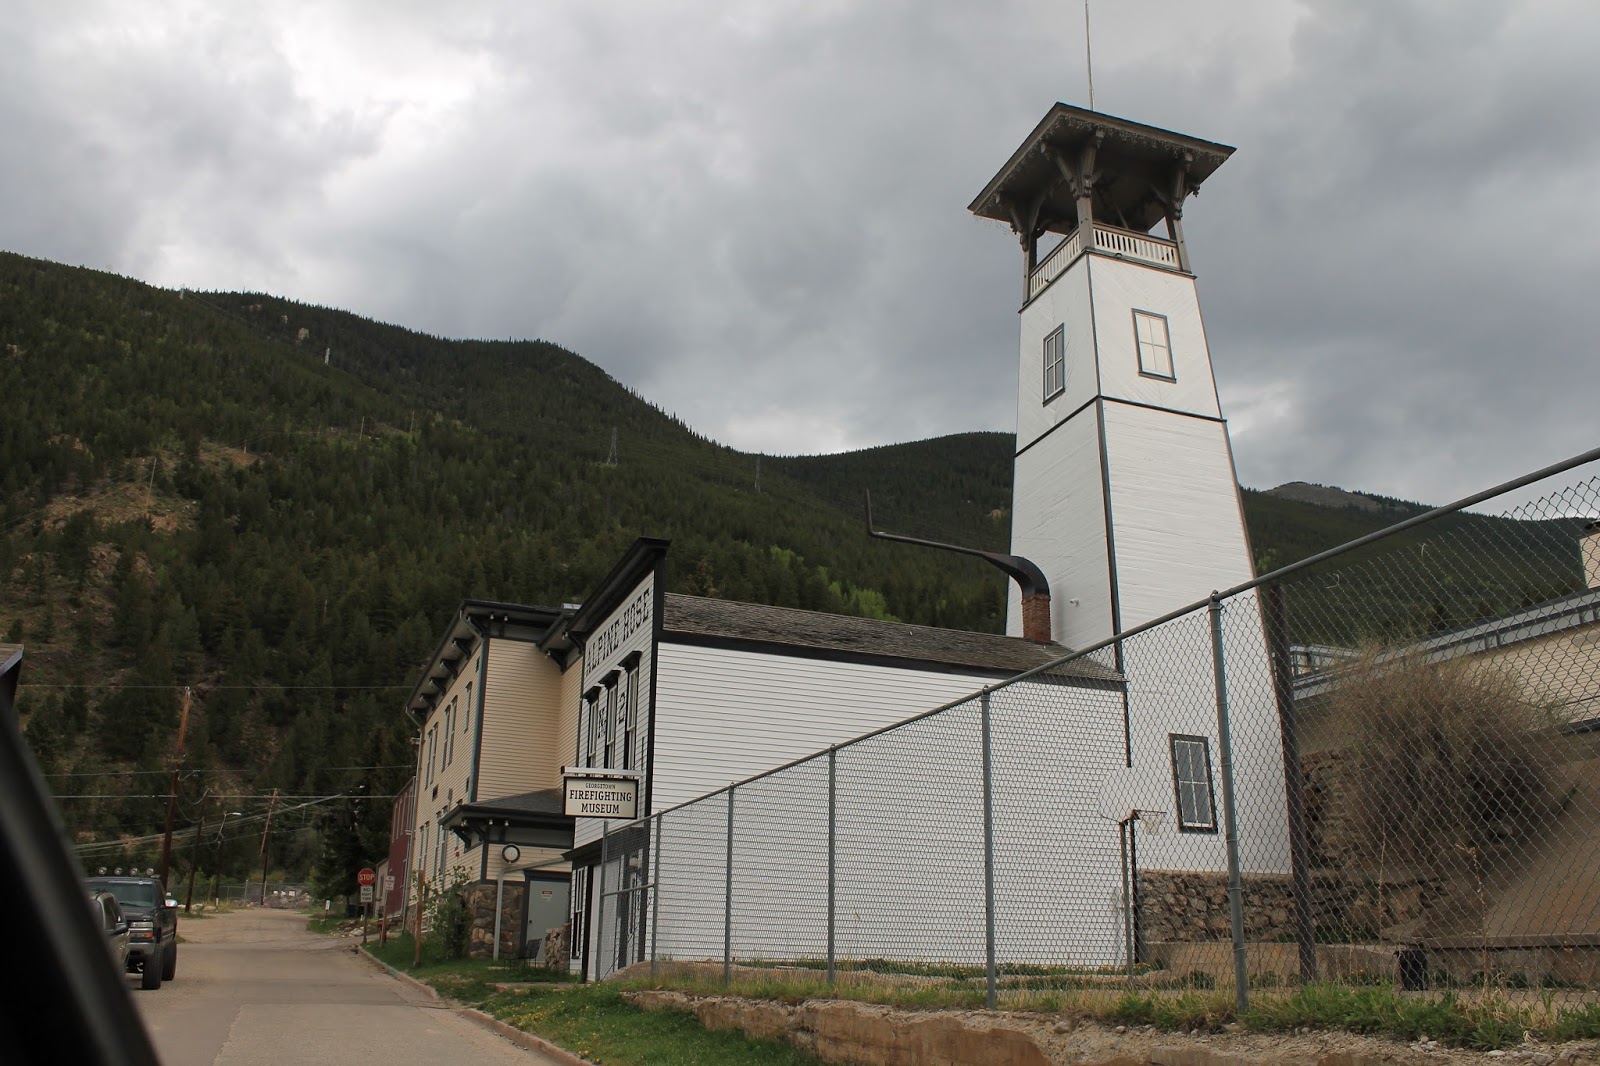
As you travel away from the town center, you'll pass Alpine House; the old firehouse, which is now a firefighting museum.


Here's the former merchant and tailor shop that sits on a steep slope. At the top of this street, we'll turn left and head up onto Guanella Pass.


The Pass from Georgetown to the other side is 22 miles. However, we only drove to the top during this trip. We stopped along the way at this park where we got out and took a short hike in the woods. Here's my husband just before we crossed the bridge over the creek.


It was so beautiful, even on this overcast day.


Can you see the unusual face peeking out from this tree?


A sweet little flower.


The aspen trees.


We got back on the road and continued our climb up the Pass, where the aspens are replaced by fir trees.


The scent is intoxicating at this level!


The views, breathtaking!


I'm sure you'll agree that our trip that began with the hope of finding great places to photograph quilts was fruitful indeed!