Tuesday, April 30, 2013

Welcome To Quiltmaker's 100 Blocks Blog Tour!


I hope you're enjoying the Blog Tour as much as I am . . .

My block is: Groovy, block #633.


You can find it on page 38 of Quiltmaker's Summer 2013, Volume 7, 100 Blocks magazine (I LOVE this magazine!). The magazine will be on newsstands by May 7.

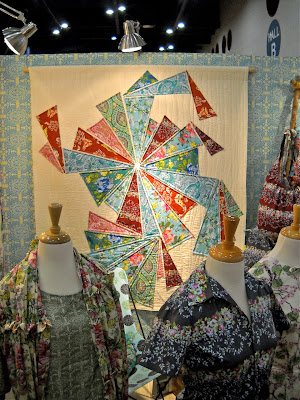
I was honored to be asked to make Amy Butler's Alchemy Quilt: her free PDF quilt on her website. Here is an image of the quilt I made, hanging in Amy's booth during Fall Market, 2012.

Quilt designed by David Butler, using Alchemy collection by Amy Butler for Westminster/Rowan


At that same time, I came up with this idea of using strips of her Alchemy fabric collection in an easy foundation paper piecing block and submitted it to Quiltmaker for their widely successful 100 Blocks series.


Are you enjoying the blog tour so far? I hope so!

I'm giving away 3 copies of the current 100 Blocks magazine (1 copy directly from Quiltmaker, 2 copies from me, and giving away more this summer!). To enter to win, please let me know what your favorite type of quilting is by leaving a comment, below:

Is it piecing? Or, perhaps, using a special method, such as foundation paper piecing or applique (hand or machine)?

AND . . .

I sure would love it if we became friends on Facebook or Twitter, follow my Facebook Fan Page, follow me on Pinterest (I've just switched my personal page over to my business page, so more quilt-related items will be coming!), or sign-up for my SuzGuz NuzLetter through my Contact Us page! I've met so many wonderful people across the country and around the world and you make such an important difference in my life! :)


Enjoy the blog hop! And thanks so much for stopping by!

Winner Announced Monday, May 6th, 2013

Wednesday, March 13, 2013

Tutorial Tuesday: PFAFF quilt expression 4.0, Week 2

Welcome to Week 2 of my PFAFF Tutorial Tuesday. Each week, I'll be showing new features of my PFAFF quilt expression 4.0 sewing machine. The purpose of these tutorials is to familiarize ourselves (self-included!) with the numerous features of this machine.

This week, we're reviewing the remaining buttons in the first section of the sewing machine's face plate. I thought I'd have enough time to also cover the various presser feet and how to achieve a perfect 1/4" seam. However, I'm thinking it may be a bit too much information to share with all we're covering today.

There are five button options to the left of the graphic display screen that we didn't cover in last week's tutorial.

Stitch Restart Button
The first of these last five options is the stitch restart button, shown here (2nd button down on left with  image of arrow pointing left):


If you are working on a project and have to stop in the middle of a stitch, simply press the stitch restart button and you will start sewing at the beginning of the stitch again without having to reset any special settings you've made. This button is a must-have if, for example, you are using a decorative stitch and need to replace your thread in the middle of sewing a motif. The built in stitch restart feature makes it easy to resume right where you left off.

Let's say that you are sewing a decorative stitch and see that you only need one more motif for your project. While sewing the last motif, press this same stitch restart button. The stitch will finish and the machine will then stop after your motif is finished!

Speed Control
The third button down on the left is the speed control button:


The speed control button can come in handy for a variety of reasons. Here are a few for you to consider:

1) If you are a beginning sewer, what better way to learn than to take it slow? Simply press this button until you are comfortable with the given speed and you will learn at a pace that is comfortable for you!

2) Another reason to use this great feature is if you are a beginner when it comes to machine quilting. Using this slow-down feature will allow you to build your confidence without worrying you may accidentally "put the pedal-to-the-metal" and mess up a planned quilting motif.

3) How about this . . . you've just discovered how much you love a quilt block with a curve (i.e., New York Beauty, Drunkard's Path, or a simple circle patch you'd like to sew to your quilt top). If you've never sewn an arc or circle before, slowing your machine down to a comfortable pace will take away your fears and allow you to finish your task with finesse.

Immediate Tie-off
The button on the top right is the immediate tie-off button.


When pressed while sewing, the immediate tie-off button will sew a few tie-off stitches, then automatically stop. What a great feature to have, right? Gosh, I sure wish I had this feature when I was making Amy Butler's Alchemy sample quilt for her booth for Fall Market last year. Making all of those triangles would have gone so much smoother! :)

Presser Foot Up and Extra Lift Toggle
Press the second button down on the right for the presser foot to raise:


Once pressed, the presser foot raises up, like so, to a comfortable height . . . (note: needle is down in this image because I had the 'needle down' button engaged from last week's tutorial. This shows you how the presser foot up button still works, whether your needle is up or down!).


Press the button a second time, and your presser foot will raise to an extra height . . .


This second, higher position will allow you to easily insert and remove bulky projects, such as a sandwiched quilt top. Isn't that fantastic? :)

Presser Foot Down and Pivot Toggle
The final button we're covering this week is the third button down on the right . . .


Since my images on how this button works would simply show the presser foot in the "down" position, I'll share with you that if you press this button a second time, the presser foot will raise to a height where you can pivot your work when needed, then lower automatically when you start sewing again.

Thanks so much for learning these buttons right along with me! Next week, we'll be covering the presser feet, as well as how to achieve a perfect quarter-inch seam!

Please be sure to ask any questions you may have and I'll address them in an upcoming blog.
Tuesday, March 12, 2013

Quilts from Quiltmaker's 100 Blocks Issue Winner Announced!


To all who participated in my Giveaway of 1 issue of "Quilts from Quiltmaker's 100 Blocks", thank you! I thank you for sharing the projects you're working on! I always enjoy hearing what you all are sewing!


The winner of my extra issue of the magazine is . . .

. . . using an online random number generator:


Congratulations to Dee!

Tuesday, March 5, 2013

Tutorial Tuesday: PFAFF quilt expression 4.0, Week 1

Welcome to Week 1 of my PFAFF Tutorial Tuesday. Each week, I'll be showing new features of my PFAFF quilt expression 4.0 sewing machine. The purpose of these tutorials is to familiarize ourselves (self-included!) with the numerous features of this machine.

In this first tutorial, I will show you a few features of my machine that made my decision in choosing this model a no-brainer.

1. I wanted a machine with a large throat space for quilting because this year I plan to teach myself how to machine quilt.


The PFAFF quilt expression 4.0 has a throat space of approx. 10" between the needle on the left, and the wall on the right. Additionally, the space has a height of approx. 4 1/4". This offers an abundance of space compared to a standard sewing machine.

2. The next exciting benefit of this machine is the trademarked PFAFF IDT, or, Integrated Dual Feed. IDT is an optional feature that is extremely easy to use. See the black "arm" that sits behind the needle?


 Be sure to have your presser foot raised, then simply press the IDT arm down and forward toward your presser foot to engage:


To release the IDT, pull the shaft down . . .


 . . . and back to disengage:


The IDT is a feature commonly found on industrial machines. It allows an even feed of fabric from both the top and bottom. In other words, it is like a locking mechanism that allows your presser foot and top fabric to stay in simultaneous motion with your feed dogs and bottom fabric. Why is this so beneficial? Well, it allows you to sew two pieces of fabric together evenly and without shifting (using any type of fabric!) alleviating puckering, and allowing for a smooth, perfect seam.

3. The 3rd feature I'd like to point out is the amount of light provided at both the needle and on the sewing deck.


These lights are bright and illuminate the entire sewing area. You can even replace them yourself! Purchase bulbs from your authorized PFAFF dealer, then use the light bulb remover as instructed under the Maintenance section of your owner's manual to pull out the old and replace with the new.

4. Automatic thread snips are included with the touch of a button.


Directly to the left of the display screen on the front of the machine, you'll see an image of a pair of scissors. When you are finished sewing, press the scissors button to cut the top and bobbin threads. The presser foot and needle will automatically raise when finished so you can easily remove your project.

5. Needle down/up. Pressing the button with the image of a needle in the down-position will illuminate the light to the left of the button . . .


. . . and drop your needle and presser foot down onto your project.


I like using this feature because when you stop sewing, the needle will stop in the down position and holds your project in place while the presser foot automatically raises slightly in case you need to check something. I recently used this feature while adding binding. It came in handy when I got to the corners where I had to pivot the project to continue sewing the next side of the binding in place. Note: You can always tap the foot control to raise or lower the needle.


Tune-in next week when we tackle the rest of the buttons in this first section of the sewing machine face and talk about the presser feet and how to get the perfect quarter-inch seam!

Please be sure to ask any questions you may have and I'll address them in an upcoming blog.

Surprise Giveaway!

(Note: PFAFF Tutorial Tuesday will follow this post!)

Imagine my surprise as I opened the Priority Mail envelope to two issues of Quilts from Quiltmaker's 100 Blocks, the newest spin-off issue from the 100 Blocks issues. I was stumped as to why I received them.


 I opened the cover and there was my answer! My applique block, called Bertrand's Arrows, seen in Quiltmaker's 100 Blocks, Vol. 3, was re-created into a quilting motif in Tutti-Frutti, a quilt designed by Jacquelynne Steves, shown on pages 18-21.

Jacquelynne combined her block, Neapolitan, from 100 Blocks, Vol. 4, with a solid white block where she included my block's outline as a quilting motif.

The Quilts from Quiltmaker's 100 Blocks issue has 19 different quilt patterns and a bonus of 7 table runner patterns. It's packed full of great ideas.

So because I now have two issues, and really only need one for myself, I'm giving away the second issue to a lucky winner! Here's what you'll do to enter this giveaway . . .

If you have a Blogger ID: Simply leave a comment on this blog letting me know what sewing project you're currently working on or one you're interested to try. This can be any sewing project!

If you do not have a Blogger ID (and your comment will post as "Anonymous"): I would still love to hear what sewing project you're working on or interested in trying, but you'll have to copy your comment and paste it into an email. Send your message to me with your full name. If you win, I will know who the winner is and can easily email you for your mailing address. You can send your comment to: info at suzguzdesigns dot com.

This giveaway ends at midnight, Mountain Time, Monday, March 11th. I will announce the winner in next week's PFAFF Tutorial Tuesday, on Tuesday, March 12th.

I look forward to reading what everyone is up to!

Good luck!

Wednesday, February 27, 2013

*NEW*: PFAFF Tutorial Tuesday

Hello friends!

Beginning next week, I will be hosting a free tutorial on Tuesdays where I'll be covering the features and benefits of the PFAFF quilt expression 4.0 sewing machine, my PFAFF machine of choice. I will be using Aurifil threads in those segments where sewing demonstrations are shown.


Please join me in discovering the potential of this amazing machine! I'll be learning right along with you, since this machine is new to me, too. If you have questions along the way, please ask as we go. I will then answer any questions in the next week's post.

Upon conclusion of these sessions, I will periodically host quilting-related tutorials using my PFAFF quilt expression 4.0 machine on Tuesdays.

Wednesday, February 20, 2013

Announcing Something New

I'm so thrilled to announce that I am now an ambassador for PFAFF sewing and quilting machines.

My sewing machine of choice is their quilt expression 4.0.

Fabric courtesy of Westminster Rowan

My new girl sews like a dream with my Aurifil threads . . . they perform like best friends!

In the coming weeks, I will be sharing all of the neat features this amazing machine offers as I learn them.

Please join me in my journey.